
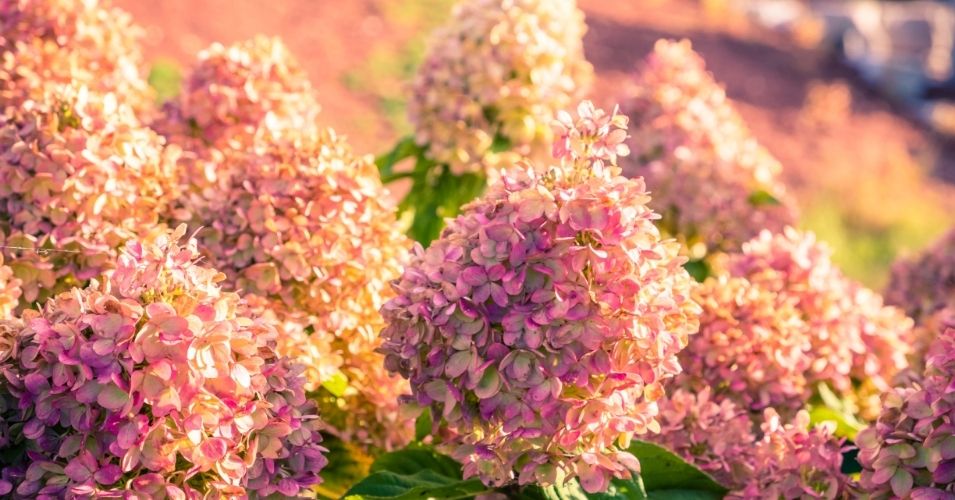
As summer fades and the air begins to cool, hydrangeas shift their energy from producing blooms to preparing for rest.
Fall is the season where thoughtful care ensures their survival through winter and sets the stage for vibrant blossoms the following year.
Many gardeners underestimate how much fall care matters, but it can be the difference between weak plants and flourishing ones.
With a few simple steps, you can protect your hydrangeas, encourage healthy roots, and welcome another year of colorful blooms.
The Best Time to Prune
Hydrangeas bring life to gardens through the warm months, but as fall approaches, many gardeners begin to wonder when pruning should take place.
Timing is not just about convenience. It is about ensuring that the plant has the strength to recover, form buds for the next season, and continue to thrive year after year.
Fall pruning can be helpful, but it requires care. In most cases, the heavy pruning of hydrangeas is better done in late winter or early spring, depending on the type.
However, fall is an excellent time for light shaping and the removal of any branches that are weak, damaged, or crossing awkwardly. By focusing on this kind of selective cutting, you give the plant a cleaner structure without interfering with next year’s growth.
One important detail to understand is that not all hydrangeas bloom on the same type of wood. Bigleaf and oakleaf hydrangeas bloom on old wood, which means their flower buds are formed during the summer and rest on stems through the winter.
If you cut too heavily in fall, you risk removing the buds that would bring color the following year. On the other hand, smooth hydrangeas and panicle hydrangeas bloom on new wood. These varieties are more forgiving and can handle pruning later in the season without losing their ability to flower.
When working with your hydrangeas in fall, always start by cleaning your tools. Sharp, sanitized pruners make cleaner cuts and reduce the chance of disease entering through wounds. Remove spent blooms if they are weighing down stems, but leave enough of the plant intact to shield buds from harsh weather.
Pruning also allows you to remove any stems that are diseased. By clearing them away in fall, you prevent problems from spreading once the plant enters dormancy. This practice keeps the shrub healthy and reduces stress in spring.
Timing matters, but so does moderation. A few careful cuts in fall give your hydrangeas balance and strength. Heavy cutting can wait until the season turns again and fresh growth begins to push upward.
Feed Hydrangeas Before Winter
As the days grow shorter and temperatures dip, hydrangeas begin to prepare for their long winter rest. Just like people benefit from a healthy meal before a demanding journey, hydrangeas benefit from proper feeding before the cold months arrive.
Giving them the right nutrients in fall helps strengthen their roots, build resilience, and create the conditions for abundant blooms in the next growing season.
Fall fertilizing should not be about pushing new leafy growth. Instead, it should focus on providing the nutrients that will fortify the plant beneath the soil.
A slow-release fertilizer with a balance of phosphorus and potassium works best for this purpose. These nutrients support root health and bud development, while too much nitrogen at this stage can encourage foliage growth that will be vulnerable to frost.
Adding compost is another gentle way to feed your hydrangeas before winter. A two-to-three-inch layer of rich organic matter around the base provides steady nourishment, improves soil texture, and adds protection.
As the compost breaks down, it delivers essential minerals while helping the soil retain just the right amount of moisture during fall rains and winter thaws.
When applying fertilizer or compost, spread it in a wide circle around the base of the plant rather than piling it directly against the stems. This ensures the nutrients reach the feeder roots, which extend outward from the crown. Water lightly afterward so the nutrients begin moving into the soil.
Some gardeners also use bone meal in fall, as it is an excellent source of phosphorus that supports both roots and future blooms. This natural amendment works slowly, making it ideal for long-term support over the winter season.
Fall feeding is not only about nourishment but also about balance. Combined with a layer of mulch for insulation, it ensures the hydrangea faces winter with strength stored in its roots and buds.
When spring arrives, the plant will be ready to awaken with energy, producing the lush growth and colorful blooms that make hydrangeas so beloved in gardens.
Soil Care for the Cold Months
Soil plays a vital role in how well hydrangeas survive the cold months. While the leaves and blooms fade above ground, the roots remain alive and active beneath the surface.
Giving attention to the soil in fall is one of the best ways to ensure your hydrangeas rest safely through winter and return healthy in spring.
The first step in caring for the soil is to clear away debris that may harbor pests or disease. Fallen leaves, spent blooms, and weeds can hold moisture and create an environment where harmful organisms thrive. By gently raking the base of your hydrangeas clean, you provide a fresh surface for winter protection.
Once the area is clear, consider enriching the soil with organic matter. Compost, well-aged manure, or leaf mold all add nutrients that improve soil structure. These natural amendments encourage earthworms and beneficial microbes, which continue to work in the soil even during colder months. Their activity breaks down organic material, releasing nourishment slowly over time.
Moisture control is another key part of soil care. Hydrangeas prefer consistent moisture, but saturated soil in winter can lead to root rot.
After adding compost, apply a layer of mulch around the base of the plant. Two to four inches is usually enough to regulate moisture and shield the soil from harsh temperature swings. Mulch also prevents the ground from freezing and thawing too quickly, which can damage roots.
When spreading mulch, keep it a few inches away from the stems. Piling it too close can trap moisture against the wood and create rot. Spread the mulch in a wide circle, extending as far as the plant’s drip line if possible. This way, the feeder roots receive both protection and nutrients.
Checking soil drainage in fall is also important. If water tends to pool around your hydrangeas, consider adding sand, compost, or other amendments to loosen the soil. Good drainage helps prevent problems during wet winter weather.
Soil that is cared for in fall acts as a protective blanket. It holds warmth, retains steady moisture, and delivers slow, gentle nourishment. With this preparation, your hydrangeas will enter dormancy securely rooted in rich, healthy ground.
Protecting Plants from Frost
Frost is one of the greatest threats hydrangeas face as temperatures fall. A sudden cold snap can damage buds, blacken leaves, and weaken stems. Preparing for frost ahead of time ensures your hydrangeas are shielded from harm and able to emerge strong when the seasons shift.
One of the most effective methods for frost protection is mulching. A thick layer of mulch around the base of your plants insulates the roots and keeps the soil from freezing too quickly. Mulch acts like a blanket that steadies the temperature below ground while also conserving moisture. This is especially important for young plants with shallower root systems.
Covering your hydrangeas during frosty nights can also make a significant difference.
Burlap, garden fabric, or even old sheets can be draped gently over the plant to trap warmth. Avoid using plastic directly against the leaves, as it can trap moisture and cause more damage. Secure the coverings loosely to allow some air circulation and remove them during the day so the plant can breathe.
Another helpful step is to water your hydrangeas before a frost is expected. Moist soil holds heat better than dry soil, creating a warmer environment around the roots.
Water in the morning so the soil has time to absorb the moisture before nightfall. This technique may seem small, but it can add several degrees of protection.
For added defense, consider building a windbreak if your garden is exposed. Cold winds can intensify frost damage by stripping warmth away from plants. Simple barriers made from burlap screens or wooden stakes can reduce this effect and help hydrangeas stay protected.
It is also wise to leave faded blooms on the plant until spring. While many gardeners prefer a tidy look, the spent flowers and top growth provide an extra layer of insulation for the buds beneath. Once winter has passed, they can be trimmed away safely.
Frost protection is about layers of care. From mulch at the roots to covers above, every step adds to the strength of the plant. With careful preparation, hydrangeas can face freezing nights and emerge ready to burst with life once warmth returns.
Division and Transplant for Stronger Growth
Dividing and transplanting hydrangeas in fall can breathe new life into your plants and expand their presence in the garden.
Over time, mature hydrangeas can grow dense and crowded, which may reduce their ability to bloom fully. Dividing them not only rejuvenates the original plant but also allows you to create new shrubs for other areas of your landscape.
The best time to divide hydrangeas is in early to mid fall when the heat of summer has passed but before the ground has frozen. During this period, the plant begins to slow its growth, making it less stressed by the process. Cool weather and increased rainfall also help the roots settle into their new location.
To begin, water the plant thoroughly a day before you plan to divide it. This makes digging easier and reduces stress on the roots. Gently dig around the base of the hydrangea, taking care to lift as much of the root ball as possible. Once lifted, you can separate the clump into smaller sections using a sharp spade or garden knife. Each division should have several healthy shoots and a solid root system to ensure it can thrive on its own.
When transplanting divisions, select a site that matches the needs of the variety. Most hydrangeas prefer partial sun with morning light and afternoon shade, as well as soil that is rich, moist, and well draining.
Dig a hole wide enough to spread the roots comfortably, and plant at the same depth the division was growing before. Refill with soil, press gently to remove air pockets, and water deeply to help the roots settle.
Adding compost to the new planting hole provides nutrients and improves soil texture. After planting, apply a layer of mulch to protect the fresh roots from temperature swings and to conserve moisture.
Continue to water regularly throughout fall until the ground freezes. This ensures the divisions have time to establish themselves before entering winter dormancy.
Keep in mind that not all types of hydrangea can be divided. Woody shrub types such as panicle varieties cannot be separated into clumps or divisions.
Dividing and transplanting may seem like a bold step, but it keeps some hydrangea types vigorous and prevents overcrowding. By spreading their beauty across the garden, you not only strengthen the plant’s future but also enjoy the reward of seeing new shrubs burst into bloom in the coming seasons.
Final Thoughts
Caring for hydrangeas in fall is about preparing them for rest while giving them the tools to awaken with strength and beauty in spring.
From pruning at the right time to feeding with nutrients that support roots, every step contributes to a cycle of growth that rewards patience and effort.
Soil care, frost protection, and even the division of mature plants all play their part in preserving health and ensuring strong blooms for years ahead. Each task is simple on its own, but together they form a foundation of thoughtful gardening that hydrangeas depend on.
Fall is the quiet season for these plants, yet it is also the most important time to guide their future. With care and preparation, your hydrangeas will greet the new year ready to dazzle the garden once more.